Using Reanimator
Aarthificial really came in clutch again with his Reanimation plugin. I swear this project didn’t start as an adaptation of all his works but this solution was genuinely vital to the project. It’s there to solve one issue, Unity’s Animation Graph.
For many reasons, it was not ideal for my project. First of all, I’m thinking in frames. Each animation is eight frames long, and I’m using this fact to keep every layer synchronized. Unity’s default animator tends to cut off frames when it feels like it, permanently offsetting animations and ruining the layering method. Their solution to transitioning animations is also hell for numerous reasons. The way I think about animations is closer to a flow chart, where a series of logical decisions arrives at the right animation/frame to play. Put simply, Unity’s animator does not think like this. That’s what really sold me on this video:
Reanimator is built for pixel art. It works with frames, drivers, and nodes to define animations and transitions between them. How it works and its strengths are all outlined in the video. But I do have some warnings to point out for anyone else who might be interested in using the tool.
Understanding the Animation Flow Charts

First of all, there is no visual behavior tree editor. Now this is certainly a limitation of Unity and I’m sure aarthificial did the best he could within the circumstances but the system takes a good bit to wrap your head around. Nodes are assets in your library. Animation nodes define animation frames and drivers associated with them. Switch nodes define logic gates, they have one driver that defines which node is activated next. When I was first starting work, I had these all in the same folder which was super confusing.
There’s no way to visually tell which node goes into which, making it hard to tell what logic trees actually looked like, without mapping them out on paper too. And I had to have a different logic tree for each body part, shaped in different ways to fit their own needs.
My solution to this was to use a robust naming and folder system.
Each animation follows the naming convention: [body part]_[animation name]. For example, armL_walk.anim represents the left arm’s walk animation.
Each switch node follows the naming convention: root_[body part]_[value being checked][idle or walk/parent state]. For example, root_armL_umbrellaWalk represents the check for the left arm when the character is walking, checking if the hasUmbrella value is true or false.
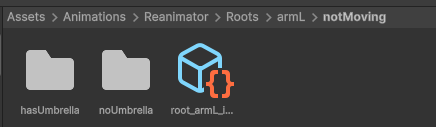
The next key was my folder system. If you think about it, a file system is a lot like a flow chart. Folders have sub folders which have sub folders, all of which you follow until you reach what you are looking for. Each folder layer looks something like this.
There’s the root switch node being checked, along with a folder for each possible outcome. Here, if the hasUmbrella value is true. This folder system has no effect on how the flow chart resolves, it just helps organize things.
Transition Animations
My next bit of advice is on how to handle transitions. There’s no real built in way to handle them, which is by design. But that meant I had to work them out on my own. My solution was to switch from boolean outputs to integer outputs. For example, originally I had a holdingUmbrella variable that was either true or false. True meant the character was holding the umbrella and false meant they weren’t. This left little room for defining a pulling out umbrella animation. I could define an gettingUmbrella boolean to check for that, but that would mean adding even more layers and splits to the flow chart, overcomplicating everything.
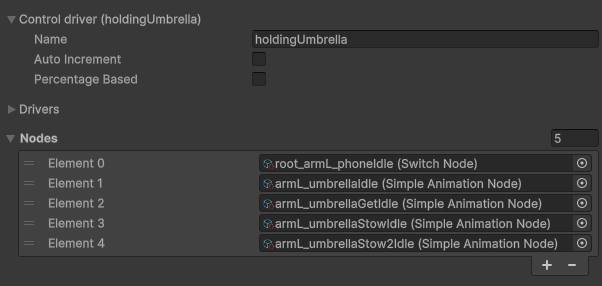
Instead I made holdingUmbrella an integer variable, with each number defining a state. “0” means no umbrella, “1” means holding an umbrella, and “2” means getting an umbrella. Essentially I made more branches from that holdingUmbrella node. This also meant I could add infinite branches with little effort if I needed to. So I could make “3” define closing the umbrella and so on.
Then I had to work out the states in code. Once a transition animation completed, I needed to detect that and change states accordingly. This is variables like one to read state information and one that triggered every time the graph resolved where super handy.
There was some more tinkering I had to do with the plugin. Exposing certain parameters like framerate that I wanted to adjust in code. It wasn’t exactly as simple or as smooth an implementation as Dynamic Pixel Mapping, but once I figured it out, it really was a godsend.
I cannot emphasize enough the nightmare this saved me from. Despite my criticisms, the system is super powerful for this sort of thing. It’s definitely not for everyone or every project, but it was well worth the effort for this one.
Next, I’ll be getting into how I handled hair and attachment points, including how I made my first editor tool.